December 29, 2012

LEGO Star Wars Millenium Falcon -cake


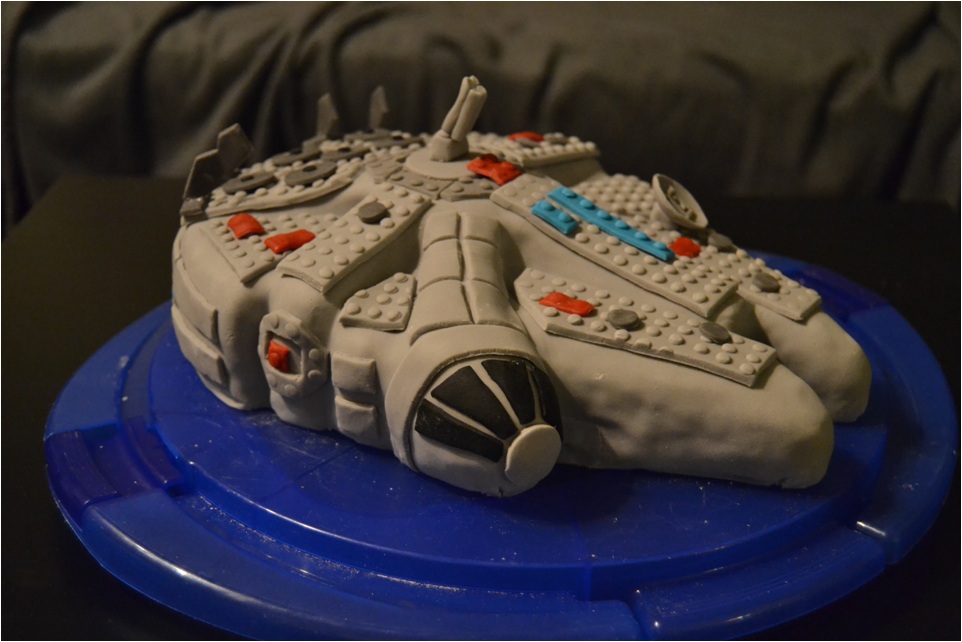
I made this cake for my brother's 26th birthday party. The theme was LEGO Star Wars (most likely decided by my brother's children), so I decided to make the most cake-like Star Wars creature - the almost round Millenium Falcon.

The flavour of the cake this time was strawberry and banana.


For the Lego knobs I destroyed re-used my approx. 2 mm thick cutting mat.

This technique worked remarkably well, and decorating the cake was eventually quite quick (which means that I had more time to concentrate on the small details such as the inside of the satellite dish.


In order to bring more colour to the otherwise so grey cake, I made the birthday boy's age also in "LEGO-bricks" (although a bit cryptically) :)


Shaped cakes are nice to carve, but covering the weird shapes with butter cream is a bit more challenging.


December 21, 2012

All kinds of cakes


strawberry and white chocolate cheesecake


I was planning on making a cheesecake to take to work, to celebrate the upcoming Christmas holiday, but because some of my work colleagues wished for other types of cakes, I decided to conduct a poll in my Finnish blog. The candidates on that poll were strawberry and white chocolate cheesecake, pear-flavoured layer cake, and a marble cake (a.k.a. "tiger cake").


pear-flavoured layer cake
Even after a dishonest poll the cheesecake was in the lead, but since I received an unexpected Christmas present of baking ingredients and my favourite chocolates from the colleague who suggested the pear-flavoured layer cake, I decided to make that one as well. And since it's Christmas, I also made the marble cake (or actually two) left in the last place in the poll.

I must be a little crazy, but all of these four cakes I made in one evening :)

The marble cake (or "tiger cake" as it's known in Finland) recipe is an age-old treasure, but this was the first time I'd ever made two of these cakes at the same time.


Tiger cake:
tiger cakes

250 g          baking margarine
2,5 dl           sugar
1 tl               vanilla sugar
4                  eggs
250 g          plain flour
1,5 tl            baking powder
0,5 dl           orange juice or milk
2 rkl             dark cocoa powder
0,5 dl           coffee, orange juice or milk


Beat together the sugar, vanilla sugar and softened margarine until fluffy. Add one egg at a time.

Mix the flour and the baking powder together in a separate bowl and add to the batter. Add 0,5dl of orange juice or milk and incorporate to the batter.
Take a few spoonfuls of the batter into another bowl and add the cocoa powder and rest of the liquid.

Pour half of the lighter batter into a greased and bread-crumbed bundt pan, add the dark batter and on top of it rest of the lighter batter. Mix the dark batter into the light one by twisting a fork in an up-right position around the pan whilst also moving the fork up and down in the mix.
Make a groove in the middle of the batter (in a circle around the pan) so that the cake will rise more evenly.


Bake in 175°C for 50-60 minutes. Allow to cool down slightly before turning the cake upright.


December 20, 2012

Thank you for the support


My charity event of selling Christmas cakes generated 78€, which I rounded up to 80€.

Lastenklinikoiden Kummit Ry (and the writer of this blog) thanks everyone who took part in this!


December 19, 2012

Displaying your Christmas cards


I usually have all my Christmas cards scattered around on any surface I can find, but this year I decided to put the side of my hallway wardrobe into good use and make my own Christmas card holder there.


I wasn't planning on publishing this in the blog, but since my mum already 'snatched' the idea after seeing this, I thought there might be someone else out there looking for an inspiration :)


The supplies used were red silk ribbon, a few jingle bells (plus a needle and some thread) and Christmas-style mini pegs from Tiger-shop.


December 18, 2012

Gingerbread, gingerbread


My inspiration ran out when it came to building a gingerbread house, and although I received ideas from my brother's family (especially the kids), this year's gingerbread structure became this haphazardly created scenery:


Windows and the ice on the pond are isomalt sugar

December 17, 2012

Christmas spice cake


I was originally supposed to make a simple spice cake following an old recipe I have, but then something happened...

The original recipe included brown sugar, which I eventually replaced by muscovado sugar (due to the fact that I happened to have it in my cupboard, and that I didn't have any brown sugar at the time). In addition, I splashed in a little bit of milk - just because something inside of me said that was the right thing to do :)


The recipe I used this time was this:


200 g          baking margarine
3 dl              dark muscovado sugar
3                  eggs
3 dl              plain flour
2 tl               baking powder
2 tl               vanilla sugar
2 tl               cinnamon
1/2 tl            cardamom
1/4 tl            ground cloves
1/2 dl           milk (because I felt like it)


Grease and breadcrumb a bundt pan. 

Mix soft margarine and sugar until fluffy. Add eggs one at a time, mixing in between. Mix the dry ingredients together in a bowl and incorporate to the batter with milk.

Bake in 175°C for about 50 minutes. Wait until the cake has cooled down a bit before turning over on a plate.


December 16, 2012

Christmas cakes to charity


First four Christmas cakes ready.

So at least 12 euros for charity already ensured :)


Only six cakes so far reserved, there's still time to take part!

December 14, 2012

Christmas spirit


Today my mum told me that people at her work (where the Saint Lucia's Day's lingonberry cake had gone to) had an idea that I could sell Christmas dry cakes. Because Christmas is so close (and selling cakes seems like a greedy idea), I had an idea to sell the cakes and donate the money to charity.

I wanted to help the children in Finland, so I chose Lastenklinikoiden Kummit Ry as the charity I wanted to give money to. I will be making the dry cakes (maximum of ten) during next week, and all the money (I will be donating the ingredients) will go directly to charity. 

If you want to be part of something good and make sure you'll get a cake of your own, please let me know. In case there's going to be a high demand; I will only have time to bake a maximum of ten cakes, so the cakes will be sold in the order the requests come in :)

Please note that this is only applicable to people I know and are able to collect the cake from me!


The price for a cake is 3 euros (= the price of ingredients) + donation of your choice.

December 13, 2012

Saint Lucia's Day's lingonberry cake


If you want your home to feel like Christmas, it's an excellent idea to bake a Christmassy spice cake, which brings the smell of gingerbread biscuits to your home.


This idea came from an idea to make my mum (for her Finnish 'name day') a Saint Lucia's Day's cake for her to take to work. The cake was originally supposed to be shaped as the crown of candles Saint Lucia wears on her head, and after a little research I learned that the crown was originally made of lingonberry shrubs, so I decided to search the internet for lingonberry cake recipes. I ended up with this simple dry cake recipe, and gave up the idea of making a cake shaped as the crown of candles after all. Although you could still make this the crown too, with the help of a few added birthday candles... ;)


Lingonberry cake:

80 g       butter or baking margarine
4,5 dl      plain flour
3 dl         granulated sugar
2 tsp       ground ginger
2 tsp       cinnamon powder
1 tsp       ground cloves
2 tsp       bicarbonate of soda
1,5 dl      lingonberry purée
3 dl         milk


Grease and cover the inside of a bundt pan with breadcrumbs. Melt the butter or margarine. Mix all the dry ingredients together and add the lingonberry purée, melted butter or margarine and milk. Stir well.

Pour the cake mix into the pan and bake in 180°C for 50-60 minutes.

Turn the cake over and let cool down under the pan.

December 8, 2012

Wedding cake


A few months ago I got a request for a cake or two for "a party" around the middle of December. I was excited, of course. I love making cakes. 
When after a while I was told that it was going to be a wedding (although a very small one and a surprise to all the guests), I got even more excited. I was also very flattered. A wedding cake is - after all - a wedding cake, no matter how small the party.

I had about three months time to design this cake, and every so often wanted to just start bringing my designs to life. I wanted to make a tiered cake - partly because I've wanted to try making a tiered cake, and on the other hand because it was going to be a wedding cake,

I also wanted to make this cake personal but elegant at the same time, so I ended up just personalising the decoration.

This couple both seemed enthusiastic about kettlebelling, so I wanted to incorporate that into the cake one way or another. With this theme in mind I made three different designs of the cake (or more like of the ornament), of which the couple decided on this bride holding the groom - even the groom himself liked this one! :)

Because the ornament needed time to dry really well, it was possible (and necessary) to make it beforehand. So I made this bride and groom ornament a couple of weeks ago already, and all started from a wire skeleton which I shaped according to the model picture.


Filling the wire skeleton with sugar fondant proved to be a difficult task at first, as the fondant was reluctant to stay on the smooth wire surface. You learn by trying, so after a while I managed to get the bride done. The groom was an easy task after having practiced the correct technique with making the bride.

Despite the original design, the groom got a top hat on his head. That also solved my problem of how and what from to make his hair. In the end the hair was left "hidden" under the hat :)

For some reason the bride became sturdier than intended (sorry about that ;) ), but otherwise the ornament turned out as planned. And the result was - above all - personal!

The colour theme for the cake was black and white, and the desired flavour of the cake was chocolate, so I made a chocolate cake with a chocolate mousse filling. 


CONGRATULATIONS 
MINNA AND TOMI!


December 5, 2012

Independence day blueberry and white chocolate quark cake


Brilliant! A national holiday and a reason to make something yummy!

Different kinds of gelatin-based cakes are easy and fast to make, and I have had for some time now an idea to take a ordinary jellied cake "to the next level". This blueberry and white chocolate quark cake isn't that quick to prepare, as its two differently flavoured layers both require their own time to set.

And when I speak about layers, I don't mean layers as such, but more like a cake inside a cake. The outcome was as hoped, but patience this cake requires more than a traditional two or three layered gelatin based cake.

On top of everything I made two different size cakes - one for work and one for my family to have over an Independence day dinner. The loose base tins I had to use were Ã¸20cm, ø24cm and ø26cm, and I also borrowed another ø24cm tin from my mum for the "hidden layer" of the bigger cake.

First I made the base in the larger tin, then
the smaller cake on top of that
Because I wanted to make a quark cake the top layer of which would also cover the sides, I had to calculate the volumes of each cake very carefully. The formula I used was more or less like this:
Ï€*x²*h (inner cake) + Ï€*y²*(h+1)-Ï€*x²*h (outer layer)
in which x is the radius of the smaller tin, y is the radius of the larger tin and h is the height of the inner cake (in centimeters). I had to check how to calculate the area of a circle, as after years of not needing that information, I had forgotten how to calculate it. :)
This time the actual making of the cake was a bit over shadowed by all this nerdiness, at least when it comes to the time used. But well begun is half done!

For the inner cake I made a blueberry quark cake and for the top layer I made a white chocolate quark cake slightly modifying the recipe of the orange and white chocolate cheesecake I made earlier. This time I used way too much gelatin for the top layer, and I had to whisk the mix frantically every so often while I was spreading it on top of the cakes. So this wasn't quite the perfect execution. Because the white chocolate quark was difficult to spread, I decided to add a blueberry "mirror" layer on top to try to improve the look of the cakes.


HAPPY INDEPENDENCE DAY FINLAND!

December 3, 2012

Nerd baking


When the idea was to make such a cheesecake as I have planned on making (and even two different sizes), you have to calculate the ingredients even more carefully than usual.


This time the list of unconventional kitchen tools gained two new recruits; a function graphing calculator and the always so useful excel-sheet :)


...And how was the volume for a cylinder calculated again...? ;)


After calculations and re-calculations I just have to trust myself and hope that the calculations were correct and that the result will be as planned... :)


December 1, 2012

For now and for the future

Mini chocolate brownie birthday tiered cake


Tiny little blog post in the middle of all this mayhem. Actual baking has been almost non-existent for the past weeks, but I still managed to make some small things.

Last weekend's agenda was to prepare for the upcoming orders, so the only day job -free weekend in the middle of a 12 and a 10-day work periods was spent relaxing with some sugar fondant. 

Today on the other hand I relaxed by taking a very good friend of mine to a cinema as a birthday present (although a bit late, I might add). Because this was a birthday present, I of course couldn't go without a birthday cake, so I made a mini version from some chocolate brownies stacked up in the shape of a 3-tiered cake, with white chocolate decorations. You can't tell it from the picture, but the cake was actually miniature, with an approximately 9cm diameter.


Congratulations, Henna!


First there was some metal wire and sugar fondant...
The result will be revealed in a week ;)
Drying sugar fondant butterflies for an upcoming order


November 20, 2012

Chocolaty chocolate cake


This chocolaty chocolate cake was a practice over all. The purpose of this cake was to find the perfect chocolate filling to an upcoming order, and also practise some piping skills.


The base of the cake is Kinuskikissa's chocolate cake (available only in Finnish), with an added ingredient of almond crocant (which made the base very sticky, and perhaps half of the amount would have been sufficient). The base turned out to be quite dry, and we'll see if even after moistening it will be possible to slice through with simply a cake server.

For the filling of this cake I used (also Kinuskikissa's) chocolate filling with slight modifications. Instead of the 'whipping cream' I used the (unopened and still usable) double cream left over from the father's day cake, and instead of the vanilla quark product (which is actually closer to a cream cheese than quark), I used vanilla flavoured quark (the cheap kind), which I tossed in the whole pot (150g) because I had less cream (2 dl) than in the original recipe. We'll see if the result will be too sour and 'quarky'.

Because this was a practice version, I didn't want to waste expensive sugar fondant, so I decided to cover the rather rough looking cake with simply mocca butter cream (which is basically the same as in the chocolate-caramel Halloween cake, but instead of daim hot chocolate powder I used dark hot chocolate powder and instead of milk I used cold coffee (and the result is yummy!)). Because this was a practice I also decided to practise different piping techniques while I had the chance.

The basket technique on the side of the cake I really rushed, and it shows :)
And those roses still need practice (and the right consistency of butter cream).

November 11, 2012

RTG crane cake


Finished 2D-RTG-cake


This cake was also made to order. And all I can say is that I'm glad it's finished and I don't have to do it anymore! Phew! ;)

I seem to have difficulties saying no to challenging tasks. Oh, and RTG crane? Sure, why not! (Luckily the order wasn't for a freestanding 3D model...)


Under the black surface there's a chocolate-caramel cake already tried out on Halloween.

I almost cried making the plans for this cake -
the crane's so detailed

Happy Birthday Tuomo! :)

Father's day surprise cake


We have a habit of - or more like my dad has a habit of - wrapping presents up in the most imaginative ways so that it's not possible to guess what's inside. This has continued for a good few years now, and I've tried to do the same for his presents, for example one year wrapping up his present in a guitar shape.


Now, as this "cake mania" is at hand, I had the idea to this year wrap up my dad's father's day present inside a cake. And here's the result of that...


Happy Father's Day! :)


The filling of this cake is strawberry puré and strawberry-whipped cream (a strawberry puré and whipped cream mix, which unfortunately resulted in a partially melted ribbon and bow)


November 9, 2012

Grand piano cake


This time it was time for a made-to-order grand piano shaped cake.
Inside is a liquorice (a very big thing in Finland) filling made with liquorice toffee sweets I bought a couple weeks ago from a cruise ship.

The base - once again - is a basic sheet cake, which is just so easy to make these shaped cakes from. Under the black rolled fondant is a basic butter cream with an added "secret ingredient" of a few crushed salty liquorice sweets (also a big thing in Finland). The texts on top of the piano are made with melted white chocolate.


Here's another way to spend Wednesday evening ;) Some may notice that I left out some of the keys on purpose, otherwise they would have been too small to handle

I had the courage to pipe the text freehand directly on top of the finished cake

November 4, 2012

Halloween skull cake


Yesterday I asked my niece what kind of Halloween pastry she would like for today.

Her first answer was pancakes which have a picture of a skull on top. The second answer was a simple "cake that moves".

Unfortunately I wasn't able to make a moving cake this time, and the pancakes can be made later. So hopefully this "picture of a skull" is good enough...


Inside the cake is a sheet cake dyed green, and green vanilla, apple and cinnamon filling.

The cake might have been too scary if the mouth hadn't gone wrong :)

November 3, 2012

Sugar hearts


I have for some time now wanted to try making clear sugar decorations, but haven't yet come round to buying isomalt, which is used in making the clear decorations.

As a past time (and with some inspiration from Masterchef Australia and a gingerbread decoration tip from Confetti) I tried first a slightly cheaper alternative: hard candy (this time I used an orange flavoured Chupa chups lollipop).
As I only had one lollipop to work with, I couldn't make any large pieces of decorations. Therefore, after trial and error, I ended up making this kind of decorations:


Crush the lollipop to as fine powder as possible. Spread the powder evenly on a baking paper laid on a baking tray and heat up in the oven at about 175°C for a couple of minutes until the powder has completely melted.
When the sugar is still hot, press the desired mold (large uniform surfaces are less fragile) firmly into the mix and let the mixture cool for a bit.
When the sugar is still slightly warm, carefully snap the surrounding sugar off the sugar shapes. Left over sugar can be crushed and used again.