February 24, 2013

Savoury treats for a birthday


As I already mentioned, I turned 30 whether I wanted it or not. The birthday cake and its disastrous ordeal deserved their own post, so here is a separate post for tips and recipes for some savoury party treats.


The beef pasties I made well in advance and put it the freezer to wait for the party, and for the occasion they were decorated with the number 30, which I cut with number shaped cookie cutters from a thinned out puff pastry sheet and attached on top of the pasties with egg glaze before baking.

The second savoury alternative was a ham and onion cream cheese cake, the recipe of which can be found below. For the base I used sweetish digestive biscuits, because the version I made for my actual birthday had a very crumbly cream cracker base which didn't hold together. The combination of sweet and savoury wasn't such a bad idea after all :)


Ham and onion cream cheese cake:


180 g      digestive biscuits
80 g        margarine

100 g      smoked ham
200 g      black pepper and spring onion
               flavoured cream cheese
200 g      chive falvoured cream cheese
2 dl         double cream
4             leaves of gelatin
2 tbsp     water

Fresh chives to decorate.


Crumb the biscuits and mix together with melted margarine. Press the biscuit crumbs on the bottom of a (ø24-26cm) springform cake pan and let set in the fridge for a bit.

Soak the gelatin leaves in cold water for about ten minutes until they're soft.
Cut the smoked ham into small squares and mix together with the cream cheeses.
Whip the cream to soft peaks in a separate bowl.
Squeeze out excess water from the soaked gelatin leaves and mix well with a couple of tablespoons of boiling water. Add the gelatin mix to the cream cheese mix.
Add whipped cream and mix until smooth.

Pour the cream cheese-whipped cream mix into the springform pan on top of the biscuit crumbs and let set in the fridge for a few hours, preferably over night.

NB! With this recipe the cheese layer in a ø 26 cm cake pan was about 1,5 cm in height, which I think is just enough because of the relatively greasy texture. The attached picture was taken from the earlier cream cracker -based cake (which due to its thickness left a greasy after taste) because I didn't have time/remember to take a picture of this cake.


30th Birthday spiral cake (and a sugar disaster)

The finished cake with its sugar fiasco ;)


Although my brain tells me otherwise, according to my birth certificate it was now time for my 30th birthday. Help!


In my typical fashion, I started designing my own birthday cake a long time in advance, and from the beginning I wanted to try to create a spiral cake (because I might not get a chance to try this any other time). Although I had many sleepless nights because of this intricate  design, the end result (the shape at least) was a success. In addition, my dad made me a battery powered mechanism to make my hand-made poured-sugar decoration to spin on top of the cake (perhaps I've watched too many cake decorating programs on tv?) :)


My dad's mechanism and my
hand-made sugar decoration
That was all the success there was to this cake, in my opinion. I didn't want to cover the cake in rolled sugar fondant, because as I mentioned earlier, it doesn't taste very good. Secondly, for the sheer size and shape of the cake it would have been difficult. For this reason I ended up icing the cake with a combination of white chocolate, cream cheese and whipped cream, but I soon discovered that it was very difficult to get it looking neat and impressive (on top of everything the cream went a bit runny and dripped easily). I tried to save the day by adding texture with Wilton's decorating triangle, but despite this, the cake looked dull. In a haste I chucked some sugar into a pan thinking that I'd create a dashing spun sugar decoration on top of the cake before rushing to my party (not in any point of this great idea did the fact, that I haven't actually tried this before myself, stop me!) I did learn the right technique while tossing melted sugar around my kitchen, but even that didn't save the already ruined cake. On top of everything most of the sugar (of course) dissolved into the cream...


Shaping of the cake proved out to be the
easiest to do freehand just by twisting and
carving the cake


Despite the looks the cake at least tasted good, and the raspberry filling I used found itself to my top 3 favourite cake fillings. The cake itself was a three-tier cake, so there was plenty left over after the party.

February 20, 2013

Beef pasties


This beef pasty recipe I have most likely learned from my mum, and it's one of the oldest recipes I have ever used.


The basic idea is really simple, and the pasties will taste good even after a few days in the fridge (unless they've been eaten before that).


Beef pasties: (the filling is enough for about 64 pasties)

puff pastry sheets

400 g         minced beef
1,5 dl         rice
4-5             eggs (+ more for glaze)


Boil the eggs and rice. Fry the minced beef and season to taste. Chop the hard boiled eggs into small cubes and mix with the minced beef and the boiled rice.

Take the puff pastry sheets out of the freezer about 20 minutes before filling. Cut the sheets into squares and put a dollop (about 1 tbsp) of filling in the centre of each one.

Glaze two adjacent sides of each square with egg, and fold the squares into triangular pasties. Press the sides together firmly e.g. by using the handle end of a spoon.

Glaze the pasties with egg and bake in 225°C for about 10-15 minutes until the pasties are a lovely golden brown colour.


February 17, 2013

Angry Birds birthday cake


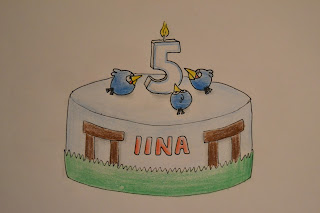
This weekend I've been busy baking, as I received two separate cake orders for the same weekend. The other one was a Christening cake picked up yesterday, and the other order was for a cake which would have three blue Angry Birds on top. I made a sketch of this cake too beforehand, even though there wasn't any need for a separate "approval" this time.


I heard a rumour that the birthday girl isn't a big fan of blowing out the candles (and had even once waited for all the candles to burn out), and the parents still wanted candles on the cake, so I thought in this case one candle is better than five.


The little birds were made out of sugar fondant in advance, as was the grass surrounding the cake (I was also invited to the party and I personally don't like thick layers of fondant on a cake, so that was one of the reasons I thought a separate grass layer was better. And it also brings some more 3D-effect on the cake). The stem of the candle I hid into a fondant-log, which also helps in keeping the candle upright.

The original plan...


CONGRATULATIONS IINA!

...and the finished cake


February 16, 2013

Christening cake for a baby girl


I was happy when I got an order for this Christening cake a few weeks ago, because I'd been longing for a new area of cake decorating. About a month ago I tried to make a simple baby's shoe out of sugar fondant, and I used that idea also in this cake. I also wanted to try something new, and therefore this little pink dummy found its way on top of the cake.


I was given a free hand with the model of this cake, as long as the colour theme was white and pink. I first did a sketch on paper (also because I wanted something to do as the actual baking was still a couple of weeks away) and got it approved before starting the cake.


Flowers were made in advance, left to dry in the
desired shape and then dusted with petal dust

The flavours were supposed to be banana and strawberry, but the use of quark was forbidden. That's why I ended up spicing up a strawberry cream mix with white chocolate (recipe below). The name on top of the cake I piped with white chocolate dyed with petal dust.


The original design with the words "Baby Girl"
as the name


Strawberry and white chocolate filling: (to fill two layers of a ø26cm cake)

300 g                 strawberry puré
approx. 0,2 dl    sugar(white chocolate adds more sweetening)
4 dl                    whipping cream
150 g                 white chocolate
5                        leaves of gelatin
2 tbs                  boiling water


Place gelatin leaves into a bowl of cold water and leave to soak for 5-10 minutes.
Melt the white chocolate carefully over a double boiler or in the microwave (Note! About 2/3 of melted chocolate is enough to melt the rest without needing to heat the mixture).

Whip the cream (you can add a teaspoon of vanilla sugar if you like).
Mix together the strawberry puré and the melted white chocolate in a separate bowl.
Squeeze the gelating leaves free from excess water and melt them with a couple of tablespoons of boiling water. Add the gelatin to the strawberry-white chocolate mix.

Add the whipped cream into the strawberry-white chocolate mix and carefully mix into an even  mixture.


February 13, 2013

Valentine's Day's Red Velvet


For some time now I've been wondering what the cake bases used in American cake tv shows taste like, and tested the "Pound Cake" earlier this year. At that time I promised to try the other, the "Red Velvet", on Valentine's day due to its colour. Finally the time has come!

There were yet again several different kinds of recipes, and after some browsing through a few, I decided to try this rather traditional sounding version.


Red Velvet:

113 g       baking margarine
3,5 dl       sugar
2              eggs
2 tbsp      cocoa powder
4 tbsp      red food colouring
1 tsp        salt
1 tsp        vanilla extract
2,4 dl       butter milk
5,9 dl       plain flour
1,5 tsp     baking soda
1 tbsp      vinegar


Cream shortening and sugar well. Add eggs and beat well.
Make a paste of cocoa and red food coloring. Add to creamed mixture. 
Mix salt, 1 teaspoon vanilla and buttermilk together. Add alternately the flour with the milk mixture to the creamed mixture. Mix soda and vinegar and FOLD INTO CAKE BATTER. DON'T BEAT OR STIR NOW.

Pour into a ø24cm loose base cake tin and bake for approximately 50 minutes. (If you're using two cake tins like in the original recipe, then the 30 minutes is enough)


Butter roux icing:

5 tbsp      plain flour
2,4 dl       milk
2,4 dl       sugar
227 g       butter
1 tsp        vanilla extract


Cook flour and milk over low heat till thick, stirring constantly. Leave to cool. While cooling, cream the sugar, butter and vanilla extract. Beat this well until light and fluffy. Add to flour mixture and beat until of a good spreading consistency.
Don't ice the cake until it's cooled down!


Note! The butter roux icing tastes of a mix of butter and sugar so I ended up using only half of it on the cake. I think the next time I'll most definitely try this with an alternative cream cheese frosting!